Knietfeld
Member
Alright, I'm here to share how I made slopes work in 4.5.9. This method makes slopes that you can run up and down, jump off of, jump through from below, and they fully interact with Objects other than the player such as enemies and NPCs.
In my current project (Rick Starfield, which I am still working on very slowly) I'd already heavily adapted the physics subroutine to suit my needs so I downloaded a fresh copy of NESMaker, followed the beginner tutorial for the metroidvania module until the point I had the character moving around onscreen and then I started messing with the scripts. So this should work for nearly anyone who started their project that way.
To make slopes we only need to make changes to three scripts: doHandlePhysics_PlatformBase.asm, doHandleTileCollisions_PlatformBase.asm, and jump_throughPlat.asm.
Because these scripts are shared across (I think) all of the platformer based modules, my slopes method should work for any platformer or metroidvania game.
I've attached my edited scripts and I'll briefly explain how to place them in your game for beginners or people who may have forgotten how. But if you've already edited any of these scripts you won't want to simply replace the scripts you've modified so I've heavily commented the code I wrote so hopefully any intermediate to advanced users can figure out what's going on and cut and paste and modify parts to suit their needs (just look for the parts that say my initials, "kn" to signify parts I added. Also I generally code in lower case opcodes and Joe uses upper case so that might tell you who wrote what unless I copy pasted his work). I was planning on showing how you can make more gradual slopes in addition to the 45 degree ones already set up in the code, but I just want to get this post out there. If some people have trouble trying to get that figured out on their own I can help out in the comments. I've also attached a supplemental code file that, if you can figure out where to put the pieces, can point you in the right direction to making your own slopes.
So here we go.
Trading out the original scripts with the new slope scripts
The forum wouldn't let me attach .asm files. So the attached files at the bottom are .txt files. All you have to do to make them .asm files is open them from your downloads folder in any text editor and from the File menu, click SAVE AS and at the end of the file name type ".asm".
You can save them in any of your NESMaker folders, but I suggest saving them in the same folder as the files I've adapted them from. That means, save doHandlePhysics_PlatformBase_WithSlopes and doHandleTileCollisions_PlatformBase_WithSlopes, to (your NESMaker folder)\NESmaker_4_5_x\GameEngineData\Routines\BASE_4_5\Game\MOD_PlatformerBase\Subroutines. And save jump_throughPlat_WithSlopes to (your NESMaker folder)\NESmaker_4_5_x\GameEngineData\Routines\BASE_4_5\Game\MOD_PlatformerBase\Inputs.
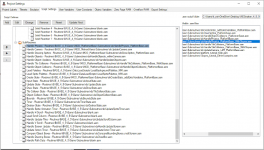
Now, in your NESMaker project, open ProjectSettings/Script Settings and scroll to the bottom where in the Sub Routines folder you will find Handle Physics and Handle Tile Collisions. Select the script you want to trade out and use the box to the right to navigate to the folder where you put the new physics and tile collisions scripts and double click the file you want to trade it with.

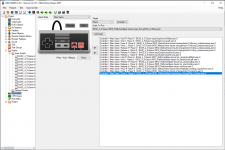
In the Project bar, click "Scripts", then "Input Scripts" and select the new jump script. Then using the Input Editor Set up the new jump exactly like the old one but with the new script. And make sure to right click and remove the old jump input.

That's it for scripts. You now have all the code you need for slopes to work in your game. So...
Making slopes work in your game
Obviously you'll want to make some graphics for slopes. I'll leave that up to you.
You'll also want to go to Project Settings/Project Labels/Tile Types and change Tile11 and Tile 12. I made my names for the tiles "Tile11 0B - o0" and "Tile12 0C - 0o." The o0 and 0o look generally like the sloped floor tiles to me which was easier for me than using words.
The scripts I've attached only make two types of slopes and they are hardcoded to Tile 11 and Tile 12. To change which tiles it uses is super simple. In the Physics Subroutine change the 0c and 0b in lines 537, 541, 563, and 567 to whatever tile type number you are using and change the four checks for those slopes in the jump code to reflect your new tile type numbers as well. Lines 41,43,89, and 91.
So once you've got slope graphics and names that work for you you can start putting slopes in your game.
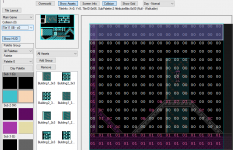
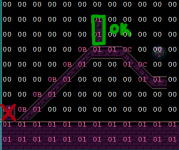
You can have different effects depending how you arrange your slope tiles. It's probably easier to just show a picture of my slopes with collisions.

Does that make enough sense? In this example the grey tiles are jumpthrough tiles and the purple are solid. Like this video.
View: https://youtu.be/kSLUKDPBwr0
The slope tiles are basically jumpthrough tiles. You can always jump through from below.
If you want to jump through the tile then you also probably want to run under it without automatically going up the slope, so you just leave that bottom tile 00. If you put 0B or 0C right at the base it works fine to run up but if you run left into 0B or right into 0C it makes the player bounce around weirdly. So, if you want your slope to be solid, and you just run up it when you approach it from the right side, you just put solid tiles under/next to the slope.
Are there any drawbacks to this method of slopes?
Well, naturally, doing a couple more collision checks and doing extra code takes more memory and processing time in each frame. Though I don't think this is much, it does these checks for every object that uses normal physics every frame, so it could slow things down a little bit.
One thing to note - the only bit of code I added to doHandleTileCollisions tells it to skip checking for solid tiles on the bottom corners of the bounding box if the object is touching a slope tile. This is necessary to allow the object to successfully step from slope to solid floor at the top of the slope. So if your object's height is more than 16 pixels (and I think many would be) you wouldn't want to put a single solid tile for the player to run into right at the top or bottom of the slope or else the object will glitch to the top of it when it registers collision. It's easy to design around. Either add another solid tile above that one so the top corners of your object hit the wall, or just don't put single tiles at the top or bottom of slopes.

Any other oddities I noticed that I thought, "oh, I should warn about that in my tutorial" I ended up fixing by the time I was comfortable posting this. So if you find things you have problems with please let me know. I'm happy to help when I have the time.
That's it! Good Luck! Have Fun! I hope this helps to make your game even more awesome.
[09/05/21 EDIT: @tbizzle brought to my attention some glitches I introduced involving ladder functionality. I edited the physics script and fixed that, and while I was at it I fixed the seam collision glitch in a way similar to the tutorial by @TakuikaNinja. The new doHandlePhysics script has replaced the old one right here in the attached files. Sorry for the frustration the old version might have caused. I'm still happy to help if anyone else has trouble integrating this into their game plan.]
In my current project (Rick Starfield, which I am still working on very slowly) I'd already heavily adapted the physics subroutine to suit my needs so I downloaded a fresh copy of NESMaker, followed the beginner tutorial for the metroidvania module until the point I had the character moving around onscreen and then I started messing with the scripts. So this should work for nearly anyone who started their project that way.
To make slopes we only need to make changes to three scripts: doHandlePhysics_PlatformBase.asm, doHandleTileCollisions_PlatformBase.asm, and jump_throughPlat.asm.
Because these scripts are shared across (I think) all of the platformer based modules, my slopes method should work for any platformer or metroidvania game.
I've attached my edited scripts and I'll briefly explain how to place them in your game for beginners or people who may have forgotten how. But if you've already edited any of these scripts you won't want to simply replace the scripts you've modified so I've heavily commented the code I wrote so hopefully any intermediate to advanced users can figure out what's going on and cut and paste and modify parts to suit their needs (just look for the parts that say my initials, "kn" to signify parts I added. Also I generally code in lower case opcodes and Joe uses upper case so that might tell you who wrote what unless I copy pasted his work). I was planning on showing how you can make more gradual slopes in addition to the 45 degree ones already set up in the code, but I just want to get this post out there. If some people have trouble trying to get that figured out on their own I can help out in the comments. I've also attached a supplemental code file that, if you can figure out where to put the pieces, can point you in the right direction to making your own slopes.
So here we go.
Trading out the original scripts with the new slope scripts
The forum wouldn't let me attach .asm files. So the attached files at the bottom are .txt files. All you have to do to make them .asm files is open them from your downloads folder in any text editor and from the File menu, click SAVE AS and at the end of the file name type ".asm".
You can save them in any of your NESMaker folders, but I suggest saving them in the same folder as the files I've adapted them from. That means, save doHandlePhysics_PlatformBase_WithSlopes and doHandleTileCollisions_PlatformBase_WithSlopes, to (your NESMaker folder)\NESmaker_4_5_x\GameEngineData\Routines\BASE_4_5\Game\MOD_PlatformerBase\Subroutines. And save jump_throughPlat_WithSlopes to (your NESMaker folder)\NESmaker_4_5_x\GameEngineData\Routines\BASE_4_5\Game\MOD_PlatformerBase\Inputs.
Now, in your NESMaker project, open ProjectSettings/Script Settings and scroll to the bottom where in the Sub Routines folder you will find Handle Physics and Handle Tile Collisions. Select the script you want to trade out and use the box to the right to navigate to the folder where you put the new physics and tile collisions scripts and double click the file you want to trade it with.

In the Project bar, click "Scripts", then "Input Scripts" and select the new jump script. Then using the Input Editor Set up the new jump exactly like the old one but with the new script. And make sure to right click and remove the old jump input.

That's it for scripts. You now have all the code you need for slopes to work in your game. So...
Making slopes work in your game
Obviously you'll want to make some graphics for slopes. I'll leave that up to you.
You'll also want to go to Project Settings/Project Labels/Tile Types and change Tile11 and Tile 12. I made my names for the tiles "Tile11 0B - o0" and "Tile12 0C - 0o." The o0 and 0o look generally like the sloped floor tiles to me which was easier for me than using words.
The scripts I've attached only make two types of slopes and they are hardcoded to Tile 11 and Tile 12. To change which tiles it uses is super simple. In the Physics Subroutine change the 0c and 0b in lines 537, 541, 563, and 567 to whatever tile type number you are using and change the four checks for those slopes in the jump code to reflect your new tile type numbers as well. Lines 41,43,89, and 91.
So once you've got slope graphics and names that work for you you can start putting slopes in your game.
You can have different effects depending how you arrange your slope tiles. It's probably easier to just show a picture of my slopes with collisions.

Does that make enough sense? In this example the grey tiles are jumpthrough tiles and the purple are solid. Like this video.
The slope tiles are basically jumpthrough tiles. You can always jump through from below.
If you want to jump through the tile then you also probably want to run under it without automatically going up the slope, so you just leave that bottom tile 00. If you put 0B or 0C right at the base it works fine to run up but if you run left into 0B or right into 0C it makes the player bounce around weirdly. So, if you want your slope to be solid, and you just run up it when you approach it from the right side, you just put solid tiles under/next to the slope.
Are there any drawbacks to this method of slopes?
Well, naturally, doing a couple more collision checks and doing extra code takes more memory and processing time in each frame. Though I don't think this is much, it does these checks for every object that uses normal physics every frame, so it could slow things down a little bit.
One thing to note - the only bit of code I added to doHandleTileCollisions tells it to skip checking for solid tiles on the bottom corners of the bounding box if the object is touching a slope tile. This is necessary to allow the object to successfully step from slope to solid floor at the top of the slope. So if your object's height is more than 16 pixels (and I think many would be) you wouldn't want to put a single solid tile for the player to run into right at the top or bottom of the slope or else the object will glitch to the top of it when it registers collision. It's easy to design around. Either add another solid tile above that one so the top corners of your object hit the wall, or just don't put single tiles at the top or bottom of slopes.

Any other oddities I noticed that I thought, "oh, I should warn about that in my tutorial" I ended up fixing by the time I was comfortable posting this. So if you find things you have problems with please let me know. I'm happy to help when I have the time.
That's it! Good Luck! Have Fun! I hope this helps to make your game even more awesome.
[09/05/21 EDIT: @tbizzle brought to my attention some glitches I introduced involving ladder functionality. I edited the physics script and fixed that, and while I was at it I fixed the seam collision glitch in a way similar to the tutorial by @TakuikaNinja. The new doHandlePhysics script has replaced the old one right here in the attached files. Sorry for the frustration the old version might have caused. I'm still happy to help if anyone else has trouble integrating this into their game plan.]
Attachments
Last edited:
