[4.5.9] Quick question about using Temp variables...

Jonny

Well-known member
Is there any speed advantage to storing temp values in this situation... or will both run exactly the same?

Before...

Code:
    DrawSprite #010, #208, #$54, #%00000000 ;; TOP        ;;
    DrawSprite #048, #208, #$54, #%01000000
    DrawSprite #111, #208, #$54, #%00000000
    DrawSprite #137, #208, #$54, #%01000000
    DrawSprite #200, #208, #$54, #%00000000
    DrawSprite #238, #208, #$54, #%01000000
    
    DrawSprite #010, #224, #$54, #%10000000 ;; BOTTOM     ;;
    DrawSprite #048, #224, #$54, #%11000000
    DrawSprite #111, #224, #$54, #%10000000
    DrawSprite #137, #224, #$54, #%11000000
    DrawSprite #200, #224, #$54, #%10000000
    DrawSprite #238, #224, #$54, #%11000000

After...

Code:
    LDA #$54
    STA tempA
    LDA #208
    STA tempB
    LDA #224
    STA tempC
    
    DrawSprite #010, tempB, tempA, #%00000000 ;; TOP        ;;
    DrawSprite #048, tempB, tempA, #%01000000
    DrawSprite #111, tempB, tempA, #%00000000
    DrawSprite #137, tempB, tempA, #%01000000
    DrawSprite #200, tempB, tempA, #%00000000
    DrawSprite #238, tempB, tempA, #%01000000
   
    DrawSprite #010, tempC, tempA, #%10000000 ;; BOTTOM     ;;
    DrawSprite #048, tempC, tempA, #%11000000
    DrawSprite #111, tempC, tempA, #%10000000
    DrawSprite #137, tempC, tempA, #%11000000
    DrawSprite #200, tempC, tempA, #%10000000
    DrawSprite #238, tempC, tempA, #%11000000

Is there a better way to do this? It's for my HUD which will be displayed during gameplay.
 

michel_iwaniec

New member
The second one will be a bit slower for sure, both due to the initial lda / sta sequence, and also due to each LDA arg0/1/2/3 in the DrawSprite macro taking one cycle more when loading a zeropage variable instead of an immediate value.

However, both costs are still way less than the extra cycles other instructions in the DrawSprite macro take.

MACRO DrawSprite arg0, arg1, arg2, arg3
;arg0 = x
;arg1 = y
;arg2 = chr table value
;arg3 = attribute data
TYA
PHA

LDY spriteRamPointer

LDA arg1
STA SpriteRam,y
INY
LDA arg2
STA SpriteRam,y
INY
LDA arg3
STA SpriteRam,y
INY
LDA arg0
STA SpriteRam,y
INY

LDA spriteRamPointer
CLC
ADC #$04
STA spriteRamPointer
PLA
TAY
ENDM


This macro could be optimised in the following simple ways for your typical sequence of instructions, while still keeping it *fairly* general:

1. Don't have an INY after each write. It's pointless when you can just do +1 / +2 / +3 on the memory address.
2. Don't reload spriteRamPointer in the macro - rely on it always being in Y
3. Don't push / pull the old value of Y in the macro itself - with your example code you have nothing that needs backing up between macro invocations
4. If you're not doing additions / subtractions / shifts between macro calls, you can avoid setting the carry flag before each ADC #$04

So you end up with a new variant of the same macro looking something like this:

MACRO DrawSpriteForMySpecialHud arg0, arg1, arg2, arg3
;arg0 = x
;arg1 = y
;arg2 = chr table value
;arg3 = attribute data

LDA arg1
STA SpriteRam,y
LDA arg2
STA SpriteRam+1,y
LDA arg3
STA SpriteRam+2,y
LDA arg0
STA SpriteRam+3,y

TYA
ADC #$04
TAY
ENDM

Saves quite a few cycles. But you now have to remember to add an LDY spriteRamPointer and a CLC before your sequence of macro calls, and STY spriteRamPointer after the sequence is finished.

TL;DR;

If you're not looking for a general macro you can special-case things even further of course. If you're always drawing that sprite HUD then you probably don't care about OAM cycling them as they won't interact with game objects. So you could just hard-code most of the writes the writes to the 12 sprites making up the HUD. That would allow you to load the same register once and write it to multiple locations.

In fact, with 12 sprites reserved for the HUD there's no need to write most of these bytes more than once at screen load, and then skip these writes on all other frames.

The only bytes that would need to be written in such a design are the ones that change as your HUD elements changes. The rest would be static.
As we always say in optimisation: "the fastest code in the code that never runs" :)

You can then actually set NESmaker's in MainGameLoop.asm to start writing sprites so they come after your 12 HUD sprites:

LDA userVariableSpriteRamPointerStartOffsetOrSomething ; Changed from: #$00
STA spriteRamPointer
SwitchBank #$18
JSR doScreenPreDraw
ReturnBank

(set userVariableSpriteRamPointerStartOffsetOrSomething to #48 somewhere in your code. Keeping it in a variable still allows reverting this back to #0 for game segments where your HUD isn't active)

Although you may also have to fiddle around with the code that clears all of sprite memory, to prevent your static contents from being cleared on each frame.

I should also put in a disclaimer that hard-coding offsets is generally NOT advised for newcomers, due to it effectively making your code much less general. It comes with a cost of more maintenance and less ability to adapt it to more use-cases. http://wiki.nesdev.com/w/index.php/Don't_hardcode_OAM_addresses

But as with many 8-bit optimisations, it sometimes makes sense to special-case things in a "naughty" way, if you really want that extra oompf and don't mind the extra maintenance effort... ;)
 

dale_coop

Moderator
Staff member
Not an optimization of CPU cycles but more a optimization of space (decor the free space on the bank is so small)... but you could write a subroutine that would call the macro... and use that subroutine in your redraw instead of calling N times the macro.
for example a :
Code:
DrawSpriteMyHud:
  DrawSprite tempA, tempB, tempC, tempD
RTS

And set the temp variables before calling that subroutine:
Code:
  LDA #010
  STA tempA
  LDA #208
  STA tempB
  LDA #$54
  STA tempC
  LDA #%00000000
  STA tempD
  JSR DrawSpriteMyHud
  
  LDA #048
  STA tempA
  JSR DrawSpriteMyHud

  ;; etc
 

Jonny

Well-known member
I should also put in a disclaimer that hard-coding offsets is generally NOT advised for newcomers, due to it effectively making your code much less general. It comes with a cost of more maintenance and less ability to adapt it to more use-cases. http://wiki.nesdev.com/w/index.php/Don't_hardcode_OAM_addresses

But as with many 8-bit optimisations, it sometimes makes sense to special-case things in a "naughty" way, if you really want that extra oompf and don't mind the extra maintenance effort... ;)

I'm not amazing at programming but I understand everything you've said so I'll give it a go. It's not like anything can be broken if I back things up. Thank you for the detailed explanation.

I'll also take the space optimization advice from Dale too and try that out.
 

Jonny

Well-known member
I didn't feel confident enough to try the hardcoding part quite yet. This is the full routine so far (below). It's the same for normal game and for boss screen with a check at the start to save space rather than runtime. In hindsight, combining both might have been the wrong way to do things? Would really appreciate feedback, whether I've done it right. I haven't put in the space optimisation as I'm not stuggling too much for space at the moment (bookmarked for later).

Everything works as it should, just wanted to make sure I'd understood correctly.
(myScore is actualy countdown timer, I just didn't change the name yet)

Code:
;;; GAME STATE CHECK ;;;;;;;;;;;;;;;;;;;;;;;;;;;;;;;;;;;;;;;
    
    LDA gameState         ;; CHECK GAMESTATES             ;;
    CMP #$00              ;;                              ;;
    BEQ onMainGame        ;; IS MAIN GAME                 ;;
    CMP #$04              ;;                              ;;
    BEQ onBoss            ;; IS BOSS                      ;;
    JMP skipAll

onBoss:
    JMP bossDecor

onMainGame:
    LDY spriteRamPointer
    CLC
    DrawSpriteSpec #111, #208, #$54, #%00000000 ;; TOP    ;;
    DrawSpriteSpec #137, #208, #$54, #%01000000
    DrawSpriteSpec #200, #208, #$54, #%00000000
    DrawSpriteSpec #111, #224, #$54, #%10000000 ;; BOTTOM ;;
    DrawSpriteSpec #137, #224, #$54, #%11000000
    DrawSpriteSpec #200, #224, #$54, #%10000000
    STY spriteRamPointer
    
;;; SCORE ;;;;;;;;;;;;;;;;;;;;;;;;;;;;;;;;;;;;;;;;;;;;;;;;;;

    TXA
    PHA   
    LDA #209                   ;; X POS                   ;;
    STA tempA
    LDA #216                   ;; Y POS                   ;;
    STA tempB
    LDX #$03                   ;; MYSCORE BYTES           ;;
Score:
    DEX
    LDA myScore,x
    CLC
    ADC #$73                   ;; ZERO IN TILESET         ;;
    STA tempC
    DrawSprite tempA, tempB, tempC, #$00
    LDA tempA
    CLC
    ADC #$0A                   ;; OFFSET / SPACE BETWEEN  ;;
    STA tempA
    CPX #$01
    BCS Score
    PLA
    TAX
    JMP sharedDecor
    
;;;;;;;;;;;;;;;;;;;;;;;;;;;;;;;;;;;;;;;;;;;;;;;;;;;;;;;;;;;;
    
bossDecor:
    LDY spriteRamPointer
    CLC
    DrawSpriteSpec #180, #208, #$54, #%00000000 ;; TOP    ;;
    DrawSpriteSpec #180, #224, #$54, #%10000000 ;; BOTTOM ;;
    STY spriteRamPointer
    
;;; BOSS HEALTH ;;;;;;;;;;;;;;;;;;;;;;;;;;;;;;;;;;;;;;;;;;;;
    
    DrawSpriteHud #189, #216, #$56, #$05, #$55, bossHealth, #%00000011

;;;;;;;;;;;;;;;;;;;;;;;;;;;;;;;;;;;;;;;;;;;;;;;;;;;;;;;;;;;;

sharedDecor:
    LDY spriteRamPointer
    CLC
    DrawSpriteSpec #010, #208, #$54, #%00000000 ;; TOP    ;;
    DrawSpriteSpec #048, #208, #$54, #%01000000
    DrawSpriteSpec #238, #208, #$54, #%01000000
    DrawSpriteSpec #010, #224, #$54, #%10000000 ;; BOTTOM ;;
    DrawSpriteSpec #048, #224, #$54, #%11000000
    DrawSpriteSpec #238, #224, #$54, #%11000000
    STY spriteRamPointer
    
;;; PLAYERS HEALTH ;;;;;;;;;;;;;;;;;;;;;;;;;;;;;;;;;;;;;;;;;
    
    DrawSpriteHud #019, #216, #$56, #$03, #$55, myHealth, #%00000000

;;;;;;;;;;;;;;;;;;;;;;;;;;;;;;;;;;;;;;;;;;;;;;;;;;;;;;;;;;;;

skipAll:
 

michel_iwaniec

New member
Code looks ok to me. There's just a few things I'd probably change for the sake of it :)

* Unless you want to keep the "cmp #$00" as a placeholder value, it's unnecessary in this case and many others. The LDA instruction will have set the zero flag if the value was zero.


* Typically, the most efficient loops start from a positive number and then do a dex followed by either bne or bpl. (just like LDA / LDX / LDY, the DEX / DEY instructions will set the Zero flag and Negative flag after the operation

* There's no reason to save an immediate value to tempB if you're not updating it inside the "Score" loop. An immediate value for "Y POS" / #216 will be faster.

* You're still calling DrawSprite in the loop instead of DrawSpriteSpec? I assume this is just a typo? And I assume that "DrawSpriteHud" is just another name for DrawSpriteSpec? :)

* You can reduce some instructions / cycles by moving the LDY spriteRamPointer + CLC away from sharedDecor

* I also assume you have a STY spriteRamPointer after skipAll? Otherwise it won't correctly set the pointer after the "DrawSpriteHud ... " inside ";;; PLAYERS HEALTH" has run

* Similarly, I think the "DrawSpriteHud ..." macro call inside ";;; BOSS HEALTH" has a bit of a bug, because the first "DrawSpriteHud" macro inside sharedDecor will reload the spriteRamPointer value into Y that it was *before* that call, overwriting it

* It may be needed here depending on what's calling this code... but in general constantly doing TXA / PHA and PLA / TAX is a bit of an anti-pattern in 6502 programming. It takes extra space and cycles, and unless you know that the code coming after needs the value then it's typically better to have code assume routines will trash the value and reload it as needed. And if you do want to keep it, it's worth remembering that an STX tempVar / LDX tempVar takes fewer cycles. (although it does mean having to worry about what temporary variable it goes into)

Here's some small edits (untested!):

Code:
;;; GAME STATE CHECK ;;;;;;;;;;;;;;;;;;;;;;;;;;;;;;;;;;;;;;;
    
    LDA gameState         ;; CHECK GAMESTATES             ;;
    BEQ onMainGame        ;; IS MAIN GAME                 ;;
    CMP #$04              ;;                              ;;
    BEQ onBoss            ;; IS BOSS                      ;;
    JMP skipAll

onBoss:
    JMP bossDecor

onMainGame:
    LDY spriteRamPointer
    CLC
    DrawSpriteSpec #111, #208, #$54, #%00000000 ;; TOP    ;;
    DrawSpriteSpec #137, #208, #$54, #%01000000
    DrawSpriteSpec #200, #208, #$54, #%00000000
    DrawSpriteSpec #111, #224, #$54, #%10000000 ;; BOTTOM ;;
    DrawSpriteSpec #137, #224, #$54, #%11000000
    DrawSpriteSpec #200, #224, #$54, #%10000000
    
;;; SCORE ;;;;;;;;;;;;;;;;;;;;;;;;;;;;;;;;;;;;;;;;;;;;;;;;;;

    STX tempB ; (check if preserving X is really needed?...)
    LDA #209                   ;; X POS                   ;;
    STA tempA
    LDX #$02                   ;; MYSCORE BYTES           ;;
    CLC ; (if we know the "ADC #$73" and "ADC #$0A" can never result in a carry we can clear carry just once)
Score:
    LDA myScore,x
    ADC #$73                   ;; ZERO IN TILESET         ;;
    STA tempC
    DrawSpriteSpec tempA, #216, tempC, #$00
    LDA tempA
    ADC #$0A                   ;; OFFSET / SPACE BETWEEN  ;;
    STA tempA
    DEX
    BPL Score
    LDX tempB ; (check if preserving X really needed?...)

    JMP sharedDecor
    
;;;;;;;;;;;;;;;;;;;;;;;;;;;;;;;;;;;;;;;;;;;;;;;;;;;;;;;;;;;;
    
bossDecor:
    DrawSpriteSpec #180, #208, #$54, #%00000000 ;; TOP    ;;
    DrawSpriteSpec #180, #224, #$54, #%10000000 ;; BOTTOM ;;
    
;;; BOSS HEALTH ;;;;;;;;;;;;;;;;;;;;;;;;;;;;;;;;;;;;;;;;;;;;
    
    DrawSpriteSpec #189, #216, #$56, #$05, #$55, bossHealth, #%00000011

;;;;;;;;;;;;;;;;;;;;;;;;;;;;;;;;;;;;;;;;;;;;;;;;;;;;;;;;;;;;

sharedDecor:
    DrawSpriteSpec #010, #208, #$54, #%00000000 ;; TOP    ;;
    DrawSpriteSpec #048, #208, #$54, #%01000000
    DrawSpriteSpec #238, #208, #$54, #%01000000
    DrawSpriteSpec #010, #224, #$54, #%10000000 ;; BOTTOM ;;
    DrawSpriteSpec #048, #224, #$54, #%11000000
    DrawSpriteSpec #238, #224, #$54, #%11000000
    
;;; PLAYERS HEALTH ;;;;;;;;;;;;;;;;;;;;;;;;;;;;;;;;;;;;;;;;;
    
    DrawSpriteSpec #019, #216, #$56, #$03, #$55, myHealth, #%00000000

;;;;;;;;;;;;;;;;;;;;;;;;;;;;;;;;;;;;;;;;;;;;;;;;;;;;;;;;;;;;

skipAll:
    STY spriteRamPointer

Anyway, I might have actually broken some of your stuff if those assumptions I made above don't hold, so if you're inspired by the changes try to add them one-at-a-time ;)

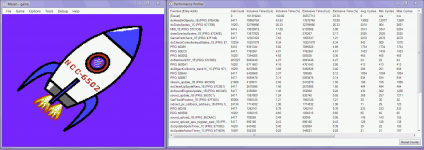
Also keep in mind that despite these minor optimisations saving some cycles it's always best to do some real profiling of the code to make sure you are actually spending time optimising the right thing.

Have you already tried using Mesen's profiler to verify what code is slowing your game down? It's a really useful tool, and will show you function names if you're either using asm6f, or are extracting the labels using jorotroid's label extractor

mesen_profiler_screenshot.png

Lemme know if that helps, and happy coding! :)
 

Jonny

Well-known member
I've learnt so much from this and taken some notes. Really appreciate your help. I'll make those changes and be checking a few other scripts where I've done similar things / mistakes. I've hardly used any features of Mesen yet but I'll try the profiler. So, would you be looking at exclusive time % primarily or average cycles? I don't understand clock speed, cycles and NMI very well yet.
 

michel_iwaniec

New member
I've learnt so much from this and taken some notes. Really appreciate your help. I'll make those changes and be checking a few other scripts where I've done similar things / mistakes. I've hardly used any features of Mesen yet but I'll try the profiler. So, would you be looking at exclusive time % primarily or average cycles? I don't understand clock speed, cycles and NMI very well yet.
Typically I sort by inclusive % and look at that. This is a common convention among more common PC profiling tools, and is meant to include both time spent in that function and all sub-functions it calls.

In contrast exclusive % only the time spent in that particular function, and not the functions it calls. That can still be a useful figure though if you're looking at the cost of the "wrapping" code in that function.

Note there are some quirks with these figures compared to more high-level languages, because for some kind of jumps it's not obvious where a function starts / ends, and Mesen can only guess. In particular some NMI code I use that fills the stack with a "call chain" of subroutine address and starts it off with a single RTS really messes up the profiler.
But for most stuff that's divided up into subroutines with a clear label and RTS it should work fine :)
 
Top Bottom