kevin81
Well-known member
UPDATE 2021-12-20 - Coming back to this five months later it seems that I've overcomplicated things quite a bit... Apparently you can simply import the .asm file in NESMaker's UI (at least in 4.5.x), which makes more than half of this tutorial unnecessary. I've added an updated version as a new post below, so if you don't want to be overly complex about this, please scroll down first.
____________________________________________________________
By default, NESmaker loops songs indefinitely. In some cases, you may want to play a song just once and have it stop playing, for instance on a start, game over or win screen. There are a few ways to tackle this problem. You could make it a sound effect, although that might cause some playback issues as a sound effect can only use two channels at a time. You could also add a bunch of empty patterns at the end of the song, but that will eventually still loop the song after the empty patterns are done playing. Another method is adding a well-timed StopSound to your code, although it might be tricky to get the timing just right. This tutorial teaches you how I would do it.
What you need
NESmaker 4.5.x
- https://www.thenew8bitheroes.com
Famitracker
- http://famitracker.com
A standalone GGSound converter - I'd suggest the FT TXT Converter, found at:
- https://www.nesmakers.com/index.php...verter-exe-version-download-in-description.7/
Step one: prepare your song
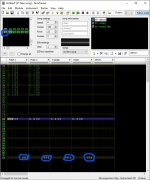
So you've written a kick-ass victory song for your win screen. Now you've got to prepare it so it doesn't loop. At the end of your pattern list, add a new frame. This frame should contain unique, unused patterns across the four main channels (we don't touch upon DPCM in this tutorial). In these patterns, add a Bxx effect on all channels, where xx is the frame number. I also added a silent instrument on top of each channel pattern, just to make sure that all playback stops.

The Bxx effect causes the song to jump to the relevant frame number. In this case, B01 jumps to the start of frame 01, causing frame 01 to loop over and over. Because frame 01 is silent across all channels, no sound will be played, essentially stopping the music.
Once everything is in place, export your FamiTracker file to text and save the text file.
Step two: convert txt to asm
Before you import the music, you have to convert the text file to asm. Usually you would import the text file directly into NESmaker, but that won't work this time. This is because NESmakers converter does not support the Bxx effect. Luckily, the original GGSound converter does, and conversion is fairly easy with the FT TXT Converter.
Simply open the folder where FT TXT Converter is located and drag the exported text file to the ft_txt_to_asm.exe file. This will generate the asm file in the same folder. In this example, we'll call it
You need to add some constants as NESmaker uses those mainly for sound effects. Open the .asm file in a text editor, copy the constants at the start of the file (the ones that start with song_index_ and sfx_index) and paste them somewhere above the line that says


________________________________________________
________________________________________________
Step three: prepare asm files for NESmaker
The music file is all done! Now it's time to import it into NESmaker without depending on its import function.
First of all, move the music asm file to your NESmaker folder. You can place it anywhere in the GameEngineData folder, its default location would be
Then, you'd want to make a copy of your Bank 1B asm file. This is where NESmaker stores the music. You can find the file in the following folder of your NESmaker installation:
In this folder, you'll find the file
Next, open this new file in a text editor. Find the line that says:
and replace it with the location of your new music file, in this example:
Step four: add asm file to NESmaker
Now it's time to open up your project in NESmaker. Go to your project settings (Project > Project Settings in the top menu, or click the cog icon) and open the Script Settings tab. Find the script that starts with "Bank 1B - Music", click on it and click the Change... button. In the script input field, replace the default Bank1B location with the new one, in our example:
Click OK. Now the new music file is in place!
There's one more thing you might want to do: import the original Famitracker text file the way you would normally. This sets up the UI so you can choose the songs on the overworld screen settings. Also you can find the correct labels easier in NESmaker's left panel.
Add or modify a screen, add the song to the screen, compile your project and test the ROM. Now it will play your song once, without it ever looping.
If you have any questions, if something isn't clear, or if I made a mistake somewhere, please feel free to comment and let me know!
____________________________________________________________
By default, NESmaker loops songs indefinitely. In some cases, you may want to play a song just once and have it stop playing, for instance on a start, game over or win screen. There are a few ways to tackle this problem. You could make it a sound effect, although that might cause some playback issues as a sound effect can only use two channels at a time. You could also add a bunch of empty patterns at the end of the song, but that will eventually still loop the song after the empty patterns are done playing. Another method is adding a well-timed StopSound to your code, although it might be tricky to get the timing just right. This tutorial teaches you how I would do it.
What you need
NESmaker 4.5.x
- https://www.thenew8bitheroes.com
Famitracker
- http://famitracker.com
A standalone GGSound converter - I'd suggest the FT TXT Converter, found at:
- https://www.nesmakers.com/index.php...verter-exe-version-download-in-description.7/
Step one: prepare your song
So you've written a kick-ass victory song for your win screen. Now you've got to prepare it so it doesn't loop. At the end of your pattern list, add a new frame. This frame should contain unique, unused patterns across the four main channels (we don't touch upon DPCM in this tutorial). In these patterns, add a Bxx effect on all channels, where xx is the frame number. I also added a silent instrument on top of each channel pattern, just to make sure that all playback stops.

The Bxx effect causes the song to jump to the relevant frame number. In this case, B01 jumps to the start of frame 01, causing frame 01 to loop over and over. Because frame 01 is silent across all channels, no sound will be played, essentially stopping the music.
Once everything is in place, export your FamiTracker file to text and save the text file.
Step two: convert txt to asm
Before you import the music, you have to convert the text file to asm. Usually you would import the text file directly into NESmaker, but that won't work this time. This is because NESmakers converter does not support the Bxx effect. Luckily, the original GGSound converter does, and conversion is fairly easy with the FT TXT Converter.
Simply open the folder where FT TXT Converter is located and drag the exported text file to the ft_txt_to_asm.exe file. This will generate the asm file in the same folder. In this example, we'll call it
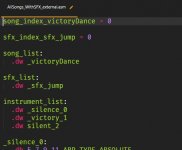
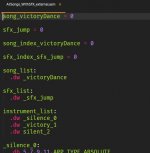
AllSongs_WithSFX_external.asm, but you can name it whatever you like.You need to add some constants as NESmaker uses those mainly for sound effects. Open the .asm file in a text editor, copy the constants at the start of the file (the ones that start with song_index_ and sfx_index) and paste them somewhere above the line that says
song_list:. Then, replace song_index with song, and sfx_index_sfx with sfx. See the "before" and "after" in these screenshots:

________________________________________________
EDIT 2022-01-14
Everything below this point is not necessary since NESMaker can import .asm files directly. I'm keeping it here for reference, as codewise you might learn a thing or two, but it can be done much easier (see the follow-up post below).
________________________________________________
Step three: prepare asm files for NESmaker
The music file is all done! Now it's time to import it into NESmaker without depending on its import function.
First of all, move the music asm file to your NESmaker folder. You can place it anywhere in the GameEngineData folder, its default location would be
\GameEngineData\SoundThen, you'd want to make a copy of your Bank 1B asm file. This is where NESmaker stores the music. You can find the file in the following folder of your NESmaker installation:
\GameEngineData\Routines\Base_4_5\System\BankDataIn this folder, you'll find the file
Bank1B.asm. Make a copy of this file (in this example I've called it Bank1B_external.asm).Next, open this new file in a text editor. Find the line that says:
.include "Sound\AllSongs_WithSFX.asm"and replace it with the location of your new music file, in this example:
.include "Sound\AllSongs_WithSFX_external.asm"Step four: add asm file to NESmaker
Now it's time to open up your project in NESmaker. Go to your project settings (Project > Project Settings in the top menu, or click the cog icon) and open the Script Settings tab. Find the script that starts with "Bank 1B - Music", click on it and click the Change... button. In the script input field, replace the default Bank1B location with the new one, in our example:
Routines\BASE_4_5\System\BankData\Bank1B_external.asmClick OK. Now the new music file is in place!
There's one more thing you might want to do: import the original Famitracker text file the way you would normally. This sets up the UI so you can choose the songs on the overworld screen settings. Also you can find the correct labels easier in NESmaker's left panel.
Add or modify a screen, add the song to the screen, compile your project and test the ROM. Now it will play your song once, without it ever looping.
If you have any questions, if something isn't clear, or if I made a mistake somewhere, please feel free to comment and let me know!
Last edited:
