Bucket Mouse
Active member
For some reason there isn't a tutorial on how to make a selection menu on the Start Screen for the latest version of NESMaker. Why, I have no idea.
Guess it's up to me again.
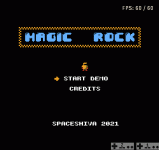
This is a script you can load into Input Scripts and assign to your Select button, but it isn't just drag-and-drop -- it will require some customization. The first thing you need to do is make an 8x8 cursor icon and assign it to one of your unused Game Objects. I have it taking up space #10. Next, place it on your Start screen as Monster #1, ONE SPACE BELOW where you want it to first appear (if you've been using NESMaker for a while I shouldn't have to explain why).
In order to customize the script below you'll need to know the exact X and Y numbers on the screen where that cursor is. You don't know, I don't know, no one knows. The coordinate numbers in the left corner can't help you here. You'll just have to experiment by entering random hex numbers until you narrow it down. There is no shame in this -- it's how I had to do it.
Here's a hint: the Y coodinate is more than likely a fixed hex number, meaning it ends with zero or eight. Mine was A0; yours may not be far off.
Test out your X and Y guesses by creating an asm file that is just the one line below, and assigning it to Select on the Start Screen:
CreateObject #$??, #$??, #10, #$00
The third number is the ID of your Game Object (ten, like I said). You don't need to worry about or do anything to the fourth number. Put hex values in the question marks.
Once you know what they are, finding the coordinates for your other menu items will be a breeze. The first number will always be the same and the second will always be eight hex digits below the previous one. So if Y was A0, then the next item will have a Y of A8, and the one after that will be B0.
The last step before tackling this script is to add a User Variable to Script Settings called "startMenu."
Note that I've arranged this in an unusual order: second, third, and then first, but before that is a one-time use section that only activates upon the VERY first time you hit Select. This is to erase the Game Object you placed on the screen. And since you hit the button, it'll go to the next menu item, which means this special section should be directed to screen #2.
Oh yeah, the screen numbers. That's another thing you need to fill in. Fortunately there's no guess work here. Bring up your overworld and hover your mouse over the screens you want each menu option to take you to. They're on a hex grid of 0 through 9 and then A through F, so a screen on the tail end of the second row would be 1F.
Now paste this in place of your one-line script and start filling in the question marks. It's written for three menu items, but easily customizable for two or four.
The Start screen as-is will work with this Select script perfectly...with ONE exception. We have to add just two lines into startGameWithNewContinuePoints, right above LDA gameHandler:
Why do we have to do this? Because for reasons that are beyond me, the cursor will be stuck onscreen for your entire game unless we specifically tell the script to get rid of it.
That's how to make a Start Screen menu in 4.5.9. Have fun out there.
Guess it's up to me again.
This is a script you can load into Input Scripts and assign to your Select button, but it isn't just drag-and-drop -- it will require some customization. The first thing you need to do is make an 8x8 cursor icon and assign it to one of your unused Game Objects. I have it taking up space #10. Next, place it on your Start screen as Monster #1, ONE SPACE BELOW where you want it to first appear (if you've been using NESMaker for a while I shouldn't have to explain why).
In order to customize the script below you'll need to know the exact X and Y numbers on the screen where that cursor is. You don't know, I don't know, no one knows. The coordinate numbers in the left corner can't help you here. You'll just have to experiment by entering random hex numbers until you narrow it down. There is no shame in this -- it's how I had to do it.
Here's a hint: the Y coodinate is more than likely a fixed hex number, meaning it ends with zero or eight. Mine was A0; yours may not be far off.
Test out your X and Y guesses by creating an asm file that is just the one line below, and assigning it to Select on the Start Screen:
CreateObject #$??, #$??, #10, #$00
The third number is the ID of your Game Object (ten, like I said). You don't need to worry about or do anything to the fourth number. Put hex values in the question marks.
Once you know what they are, finding the coordinates for your other menu items will be a breeze. The first number will always be the same and the second will always be eight hex digits below the previous one. So if Y was A0, then the next item will have a Y of A8, and the one after that will be B0.
The last step before tackling this script is to add a User Variable to Script Settings called "startMenu."
Note that I've arranged this in an unusual order: second, third, and then first, but before that is a one-time use section that only activates upon the VERY first time you hit Select. This is to erase the Game Object you placed on the screen. And since you hit the button, it'll go to the next menu item, which means this special section should be directed to screen #2.
Oh yeah, the screen numbers. That's another thing you need to fill in. Fortunately there's no guess work here. Bring up your overworld and hover your mouse over the screens you want each menu option to take you to. They're on a hex grid of 0 through 9 and then A through F, so a screen on the tail end of the second row would be 1F.
Now paste this in place of your one-line script and start filling in the question marks. It's written for three menu items, but easily customizable for two or four.
Code:
LDX #1
LDA startMenu
CMP #$01
BEQ option2
CMP #$02
BEQ option3
CMP #$03
BEQ option4
CMP #$00
BNE +
JMP option1
+

option1: ;; used only once to erase the cursor placed onscreen
        ;; heads to second option

DestroyObject
        CreateObject #$??, #$??, #10, #$00
        INC startMenu
        INC startMenu
        LDA #$??
        STA warpToScreen
        RTS

option2: ;; second menu option

DestroyObject
        CreateObject #$??, #$??, #10, #$00
        INC startMenu
        LDA #$??
        STA warpToScreen
        RTS

option3: ;; third menu option

DestroyObject
        CreateObject #$??, #$??, #10, #$00
        INC startMenu
        LDA #$??
        STA warpToScreen
        RTS


option4: ;; first menu option

DestroyObject
        CreateObject #$??, #$??, #10, #$00
        DEC startMenu
        DEC startMenu
        LDA #$??
        STA warpToScreen
        RTS
The Start screen as-is will work with this Select script perfectly...with ONE exception. We have to add just two lines into startGameWithNewContinuePoints, right above LDA gameHandler:
Code:
    LDX #1
    DestroyObject
Why do we have to do this? Because for reasons that are beyond me, the cursor will be stuck onscreen for your entire game unless we specifically tell the script to get rid of it.
That's how to make a Start Screen menu in 4.5.9. Have fun out there.