smilehero65
Active member
Hi there!
I don't think this is not an standard/proper tutorial, but didn't knew in which place share my finding (or should I call it a tip?)
So in my scrolling platformer I went from 16% to 18% on PRG$1F by:
Even though in the scrolling modules these two don't work (in Script Settings these are blank scripts) the game still handles part of them.
***EDIT: For the ones who followed this thread previously, there is an Extra Step on the HUD part
 BEFORE PROCEDING REMEMBER TO MAKE BACKUPS OF THE SCRIPTS I WILL BE MENTIONING
 --------
PATHS
--------
... and at the end (around Line 235):
--------
HUD
--------
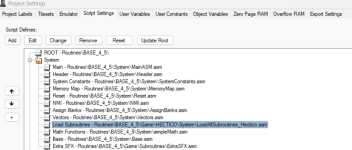
1. In Load All Subroutines (this appears on Script Settings)

In my case I will go to Line 65 and comment it:
This is basically telling NESMaker to don't ever bother to call the HUD script (is blank anyways)
2. There is still more, however.
Do you remember the screen flag Hide Hud?
It is useless in scrolling with Sprite HUD, because it only cares to hide the background sprite.
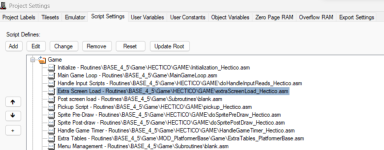
So, go to your Extra Screen Load:

In that script you will look for this part, and delete it:
Now it will not Hide the nonexistent HUD, freeing a Screen Flag for you in the process!
3. Go to your Subroutines folder (not Script Settings, I didn't find it in mine) and open doLoadScreen.asm
In there, around Line 159, you will comment DrawHud:
I just came up with this today, so please let me know if you encounter anything weird.
Hope it helps!
P.S: According to other people using scrolling, this tutorial is also useful for reducing Graphical Glitches!
I don't think this is not an standard/proper tutorial, but didn't knew in which place share my finding (or should I call it a tip?)
So in my scrolling platformer I went from 16% to 18% on PRG$1F by:
- Removing Paths.
- Removing the standard/background HUD (this only applies if you're planning to use a sprite HUD)
Even though in the scrolling modules these two don't work (in Script Settings these are blank scripts) the game still handles part of them.
***EDIT: For the ones who followed this thread previously, there is an Extra Step on the HUD part
PATHS
--------
- Go to your Subroutines folder (not Script Settings, I didn't find it in mine) and open doLoadNametableData.asm
- Go to Line 129, below notBlankTile, and you will comment:
Code:;;;; check for screen modes. ;LDA tileLayout ;CLC ;; dale_coop ;CMP #%01000000 ;BEQ checkForPathUpdates ;CMP #%01100000 ;BEQ checkForPathUpdates1 ;;;; THIS DOES NOT USE PATHS!!! ;;;; so just restore the temp value and proceed with metaTiles as if it wasn't a path value. ;LDA temp ;JMP notPath ;RTS - You will do the same for the next lines:
Code:
checkForPathUpdates1:;;;;; THIS MODE USES ONLY THE FIRST TWO "paths" AS PATHS.
    ;LDA temp
    ;CLC            ;; dale_coop
    ;CMP #$A0
    ;BEQ doPathUpdate
    ;CMP #$B0
    ;BEQ doPathUpdate
    ;JMP notPath

checkForPathUpdates:
;;;;;; THIS MODE USES ALL FOUR "paths" AS PATHS.

    ;LDA temp
    ;CLC            ;; dale_coop
    ;CMP #$80
    ;BEQ doPathUpdate
    ;CMP #$90
    ;BEQ doPathUpdate
    ;CMP #$A0
    ;BEQ doPathUpdate
    ;CMP #$B0
    ;BEQ doPathUpdate
    ;JMP notPath

doPathUpdate:

    ;; now we have to do evaluations of other tiles around us to know
    ;; exactly what to draw here.
    ;JSR handlePath
    ;RTS
... and at the end (around Line 235):
Code:
handlePath:
 ;   TXA
  ;  PHA
   ; TYA
    ;PHA

    ;.include SCR_HANDLE_PATHS


    ;PLA
    ;TAY
    ;PLA
    ;TAX
--------
HUD
--------
1. In Load All Subroutines (this appears on Script Settings)

In my case I will go to Line 65 and comment it:
Code:
doCamera:
    .include SCR_HANDLE_CAMERA
    RTS
;doDrawHud:
    ;.include SCR_HANDLE_HUD
    ;RTS
This is basically telling NESMaker to don't ever bother to call the HUD script (is blank anyways)
2. There is still more, however.
Do you remember the screen flag Hide Hud?
It is useless in scrolling with Sprite HUD, because it only cares to hide the background sprite.
So, go to your Extra Screen Load:

In that script you will look for this part, and delete it:
Code:
  LDA ScreenFlags00
    AND #%01000000
    BEQ doNotTurnOffHud
        HideHud
        JMP doneWithExtraScreenCheckForHud
    doNotTurnOffHud:
        ShowHud
    doneWithExtraScreenCheckForHud:
Now it will not Hide the nonexistent HUD, freeing a Screen Flag for you in the process!
3. Go to your Subroutines folder (not Script Settings, I didn't find it in mine) and open doLoadScreen.asm
In there, around Line 159, you will comment DrawHud:
Code:
nevermindSettingNewContinueByte:
    JSR doWaitFrame
    ;DrawHud
I just came up with this today, so please let me know if you encounter anything weird.
Hope it helps!
P.S: According to other people using scrolling, this tutorial is also useful for reducing Graphical Glitches!
Last edited:
