crazygrouptrio
Active member
Pretty much everyone wants to know how to add MORE GRAPHICS into their game without using up the available tilesets that NESmaker provides by defualt. Turns out it's fairly harmless to add an extra tileset for single stationary screens (provided you have the room to add it), so let's get to it.
First some necessary stuff:
1. Highly recommend JamesNES's tutorial to move a chunk of LoadScreen.asm to Bank 16, this way all the code we're adding will be in Bank 16 instead of the Static Bank.
2. If you haven't yet, get the NES Space Checker so you know WHERE you can add data. It's important.
3. Another useful tool, the NES Screen Tool. Not necessary as it makes it harder to draw your graphics manually, but it optimizes the graphic space for you and that is very important.
Step 1
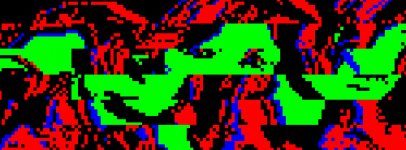
Draw your graphics. Obviously. Add them to a blank main sized background graphic image you have available and tile them however you see fit (or let NES Screen Tool do it). Don't worry, you won't need this tileset once we're done, we just need it for the next step. Here's an idea of what mine looks like, so you can get an idea of what we're going for here.

Once done, save it and in Pixel Editor go ahead and hit Export CHR and save it into GameEngineData\Routines\BASE_4_5\Graphics with the name EXTRA_CHR. You may have to make the folder.
Step 2
Go ahead and open up a new 8x8 tile screen. Set the screen tileset to a DOUBLE MAIN NO PATH, because I'm assuming you want to add as many graphics as you can. (Remember, we're only swapping out the first main, not the second one) Set the first main tileset to the one you just drew. Now just draw your graphics on the screen like normal and set the palettes how you want. Easy. Also set the screen to ScreenType 01.

Step 3
Now we need to add that exported CHR into our game in addition to NESmaker's standard screen loading script. First, pick a bank with a decent amount of space (as far as I know any bank will do) A single tileset uses roughly 5-8% space, so keep that in mind. Directly load up a bank via Script Settings, and somewhere in that bank add this:
Now open up Bank 16 so we can add the reference table for it. Somewhere near the top is fine. Easy enough:
Step 4
Next, we need to actually tell NESmaker to load up our new tileset INSTEAD of the one it normally attempts to load. This is what always confused me, but turns out it's super simple. Look in doLoadScreen.asm (or in doLoadScreen16.asm if you've moved this chunk of code into Bank 16, which I cannot recommend enough).
Scroll down to "doMMSS:" and add the commented code so that it looks like this:
Don't forget the ++ at the end so we don't load the normal tileset afterwards.
And obviously replace the first argument with the bank where you stored that CHR. What this does is when loading a Double Main No Path tileset, it will first check the ScreenType, and if it's #$01, it will specifically draw our extra CHR instead of the normal one.
Step 5
That should be it! You can now test your game to see if the graphics load correctly, and delete the tileset you used to draw the original graphic because we no longer need it! It's stored in the CHR we saved earlier and being specifically loaded on this single screen! This opens up a tileset for you to use elsewhere in your game, and not having to waste necessary space we can use in the editor for a single Title Screen.

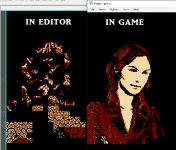
As you can see, without the graphics for NESmaker to read the image will not look correct in the editor, but that's okay. You can actually set the first main tileset to any one that you want, it really doesn't matter - just note that you can't actually use the first tileset for anything on this screen now, because it is being replaced. It will load it up correctly in game!
First some necessary stuff:
1. Highly recommend JamesNES's tutorial to move a chunk of LoadScreen.asm to Bank 16, this way all the code we're adding will be in Bank 16 instead of the Static Bank.
2. If you haven't yet, get the NES Space Checker so you know WHERE you can add data. It's important.
3. Another useful tool, the NES Screen Tool. Not necessary as it makes it harder to draw your graphics manually, but it optimizes the graphic space for you and that is very important.
Step 1
Draw your graphics. Obviously. Add them to a blank main sized background graphic image you have available and tile them however you see fit (or let NES Screen Tool do it). Don't worry, you won't need this tileset once we're done, we just need it for the next step. Here's an idea of what mine looks like, so you can get an idea of what we're going for here.

Once done, save it and in Pixel Editor go ahead and hit Export CHR and save it into GameEngineData\Routines\BASE_4_5\Graphics with the name EXTRA_CHR. You may have to make the folder.
Step 2
Go ahead and open up a new 8x8 tile screen. Set the screen tileset to a DOUBLE MAIN NO PATH, because I'm assuming you want to add as many graphics as you can. (Remember, we're only swapping out the first main, not the second one) Set the first main tileset to the one you just drew. Now just draw your graphics on the screen like normal and set the palettes how you want. Easy. Also set the screen to ScreenType 01.

Step 3
Now we need to add that exported CHR into our game in addition to NESmaker's standard screen loading script. First, pick a bank with a decent amount of space (as far as I know any bank will do) A single tileset uses roughly 5-8% space, so keep that in mind. Directly load up a bank via Script Settings, and somewhere in that bank add this:
Code:
EXTRA_CHR:
.incbin ROOT\Graphics\EXTRA_CHR.chr
Code:
EXTRA_CHR_Lo:
.db #$00, #<EXTRA_CHR
EXTRA_CHR_Hi:
.db #$00, #>EXTRA_CHR
Step 4
Next, we need to actually tell NESmaker to load up our new tileset INSTEAD of the one it normally attempts to load. This is what always confused me, but turns out it's super simple. Look in doLoadScreen.asm (or in doLoadScreen16.asm if you've moved this chunk of code into Bank 16, which I cannot recommend enough).
Scroll down to "doMMSS:" and add the commented code so that it looks like this:
Code:
doMMSS:
;;;;;;;;;;; added code;;;;;;;;
LDA screenType
CMP #$01
BNE +
LoadChrData #$YOURBANKHERE, #$10, #$00, #$60, EXTRA_CHR_Lo, EXTRA_CHR_Hi, #$01
JMP ++
+
;;;;;;;;;;;;;;;;;;;;;;;;;;;;;;;;;;;;;;;;;;;;;
    LDA backgroundTilesToLoad
    LSR
    LSR
    LSR
    LSR
    CLC
    ADC #$0F
    STA tempA
    LDA backgroundTilesToLoad
    AND #%00001111
    STA tempB
    LoadChrData tempA, #$10, #$00, #$60, BckCHRAddLo, BckCHRAddHi, tempB
++ ;;;;;; added codeAnd obviously replace the first argument with the bank where you stored that CHR. What this does is when loading a Double Main No Path tileset, it will first check the ScreenType, and if it's #$01, it will specifically draw our extra CHR instead of the normal one.
Step 5
That should be it! You can now test your game to see if the graphics load correctly, and delete the tileset you used to draw the original graphic because we no longer need it! It's stored in the CHR we saved earlier and being specifically loaded on this single screen! This opens up a tileset for you to use elsewhere in your game, and not having to waste necessary space we can use in the editor for a single Title Screen.

As you can see, without the graphics for NESmaker to read the image will not look correct in the editor, but that's okay. You can actually set the first main tileset to any one that you want, it really doesn't matter - just note that you can't actually use the first tileset for anything on this screen now, because it is being replaced. It will load it up correctly in game!
Last edited:
