baardbi
Well-known member
Difficulty level: ADVANCED
PREREQUISITES:
- Basic NESmaker skills (be able to make a player, monsters, levels, use inputs and so on...)
- You need to be reasonably familiar with the metroVania module
- I recommend that you have a code editor installed (like for example Notepad++)
- Set up User Screen Bytes https://www.nesmakers.com/index.php?threads/making-userscreenbyte0-7-work-plus-bonus.5842/ (OPTIONAL)
This step is optional, but if you set it up it will allow you to have different speeds on auto scrolling levels.
- I also recommend that you make a very simple test project in the metroVania module before you begin this tutorial)
-> A working player object that can move
-> A few screens to make sure the player movement and scrolling is working
-> If you want you can follow the intermediate tutorial on the official NESmaker site to make a test project
PLEASE READ THIS BEFORE YOU BEGIN!
So this tutorial is very much in a beta state. There are a few potential bugs and "gotcha's" here. The most obvious is going left (while the player is at the left edge) on the auto scrolling stages makes the player go off screen. There are several ways to solve this, depending on what you want to happen. You could for example make the player die or you could stop the player from going further left if he hits the left edge. None of these options are included in this tutorial. I really recommend that you try this tutorial out on a test project before implementing it into a game you're working on.
We will use the metroVania module as a base for this tutorial. The main part we need from the shooter module are the input scripts. I have included four extra scripts to allow moving in all 8 directions (so we'll use diagonals in addition to up, down, left and right).
OK. Here we go!
1. Open your metroVania test project.
2. Download the attached zip file with all the input scripts for the shooter part of our game.
3. I recommend unzipping the file here ...\GameEngineData\Routines\BASE_4_5\Game\MOD_MetroidVania\Inputs\Shooter
You need to make the Shooter folder inside the Inputs folder. This is not required, but it makes it so much easier to separate the different input scripts and makes it much more tidy if you need to find a particular script later.
4. Open your Project Settings - Project Labels - Game States. Make a new game state called Shooter Stage.

5. Set up the new scripts you just downloaded in the Input Editor.

6. Go to the Pixel Editor and make a new animation for how you want the player to look in your shooter stage. I recommend using only 1 or 2 frames for this animation. The reason is (like Joe explains in the shooter tutorial) that shooter stages will quickly get slowdown because there is so much going on in a single screen.

7. Make a new animation type for your player object. Call it "Flying" or something like that. Set it up (in the Actions tab) like in the picture below. Don't forget to check the "Ignore Gravity" box. If you have an animation with more than one frame you'll also need to set an animation speed. PS! In this example I use Action Step 3.

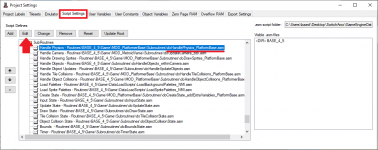
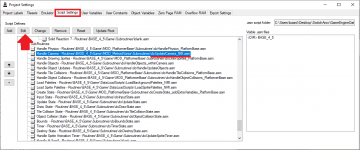
8. Go to Project Settings - Script Settings. Scroll down untill you see Extra Screen Load (it's a few lines below Game). Highlight it and click Edit.

Back up your extraScreenLoad_Platformerbase.asm before you do this next step.
9. In the extraScreenLoad_Platformerbase.asm file add this right above doneWithExtraCheck:
This will change your player to action state 3 (which is the one we set up as our flying state) on the shooter stages. Make sure you save the file.
10. Back up your doHandlePhysics_Platformbase.asm before you do this next step.
11. Replace your doHandlePhysics_Platformbase.asm with the attached script (doHandlePhysics_Platformbase_BBI.asm).
This will allow us to move up and down in the metroVania module.
The code comes from this tutorial https://www.nesmakers.com/index.php?threads/4-5-move-left-right-up-or-down-ai-monster-scripts.5582/
Thanks to @UltraNarwhal for figuring this out.
12. Back up your doUpdateCamera.asm before you do this next step.
13. Replace doUpdateCamera.asm with the attached doUpdateCamera_BBI.asm script.
This will allow us to have auto scrolling levels. The variable userScreenByte1 will store the auto scroll speed. We will set this up when we make our auto scrolling level.
*** PS! If you didn't set up the User Screen Bytes, you need to make a User Variable called userScreenByte1 now. ***
14. Go to Project Settings - Screen Flags. Rename Screen Flag 4 to Auto Scroll and click Close.

This will give us a check box called "Auto Scroll" in the Screen Details window.

15. Set UserScreenByte01 to 128 on the first screen where the auto scrolling level starts (leftmost screen). This will make the scrolling speed reasonably fast. You will probably have to adjust this.
16. Make a few screens in a horizontal line to test it out. Make sure you click Auto Scroll on the screens where you want auto scrolling. Also make sure you choose the game state Shooter Stage for the screens where you want your player to appear in his flying state (animation).
That's it! You will probably need to do lots of adjustments to make this work like you want in your game.
PS! This tutorial does not set up a hurt state for the flying stages. So if you get hurt when you're flying you will change to the normal hurt state and fall down (since your action state 7 probably doesn't have Ignore Gravity checked). You can set up one of the other action steps for a flying hurt state, but then you need to adjust your hurtPlayer script to change to that state when you're on game state "Shooter Stage".
PREREQUISITES:
- Basic NESmaker skills (be able to make a player, monsters, levels, use inputs and so on...)
- You need to be reasonably familiar with the metroVania module
- I recommend that you have a code editor installed (like for example Notepad++)
- Set up User Screen Bytes https://www.nesmakers.com/index.php?threads/making-userscreenbyte0-7-work-plus-bonus.5842/ (OPTIONAL)
This step is optional, but if you set it up it will allow you to have different speeds on auto scrolling levels.
- I also recommend that you make a very simple test project in the metroVania module before you begin this tutorial)
-> A working player object that can move
-> A few screens to make sure the player movement and scrolling is working
-> If you want you can follow the intermediate tutorial on the official NESmaker site to make a test project
PLEASE READ THIS BEFORE YOU BEGIN!
So this tutorial is very much in a beta state. There are a few potential bugs and "gotcha's" here. The most obvious is going left (while the player is at the left edge) on the auto scrolling stages makes the player go off screen. There are several ways to solve this, depending on what you want to happen. You could for example make the player die or you could stop the player from going further left if he hits the left edge. None of these options are included in this tutorial. I really recommend that you try this tutorial out on a test project before implementing it into a game you're working on.
We will use the metroVania module as a base for this tutorial. The main part we need from the shooter module are the input scripts. I have included four extra scripts to allow moving in all 8 directions (so we'll use diagonals in addition to up, down, left and right).
OK. Here we go!
1. Open your metroVania test project.
2. Download the attached zip file with all the input scripts for the shooter part of our game.
3. I recommend unzipping the file here ...\GameEngineData\Routines\BASE_4_5\Game\MOD_MetroidVania\Inputs\Shooter
You need to make the Shooter folder inside the Inputs folder. This is not required, but it makes it so much easier to separate the different input scripts and makes it much more tidy if you need to find a particular script later.
4. Open your Project Settings - Project Labels - Game States. Make a new game state called Shooter Stage.
5. Set up the new scripts you just downloaded in the Input Editor.
6. Go to the Pixel Editor and make a new animation for how you want the player to look in your shooter stage. I recommend using only 1 or 2 frames for this animation. The reason is (like Joe explains in the shooter tutorial) that shooter stages will quickly get slowdown because there is so much going on in a single screen.
7. Make a new animation type for your player object. Call it "Flying" or something like that. Set it up (in the Actions tab) like in the picture below. Don't forget to check the "Ignore Gravity" box. If you have an animation with more than one frame you'll also need to set an animation speed. PS! In this example I use Action Step 3.
8. Go to Project Settings - Script Settings. Scroll down untill you see Extra Screen Load (it's a few lines below Game). Highlight it and click Edit.
Back up your extraScreenLoad_Platformerbase.asm before you do this next step.
9. In the extraScreenLoad_Platformerbase.asm file add this right above doneWithExtraCheck:
LDA gameState
CMP #3 ;; Is this a shooter stage?
BEQ yesShooterStage
JMP notShooterStage
yesShooterStage:
ChangeActionStep player1_object, #$03
JMP doneWithGameStateCheck
notShooterStage:
doneWithGameStateCheck:
This will change your player to action state 3 (which is the one we set up as our flying state) on the shooter stages. Make sure you save the file.
10. Back up your doHandlePhysics_Platformbase.asm before you do this next step.
11. Replace your doHandlePhysics_Platformbase.asm with the attached script (doHandlePhysics_Platformbase_BBI.asm).
This will allow us to move up and down in the metroVania module.
The code comes from this tutorial https://www.nesmakers.com/index.php?threads/4-5-move-left-right-up-or-down-ai-monster-scripts.5582/
Thanks to @UltraNarwhal for figuring this out.
12. Back up your doUpdateCamera.asm before you do this next step.
13. Replace doUpdateCamera.asm with the attached doUpdateCamera_BBI.asm script.
This will allow us to have auto scrolling levels. The variable userScreenByte1 will store the auto scroll speed. We will set this up when we make our auto scrolling level.
*** PS! If you didn't set up the User Screen Bytes, you need to make a User Variable called userScreenByte1 now. ***
14. Go to Project Settings - Screen Flags. Rename Screen Flag 4 to Auto Scroll and click Close.
This will give us a check box called "Auto Scroll" in the Screen Details window.
15. Set UserScreenByte01 to 128 on the first screen where the auto scrolling level starts (leftmost screen). This will make the scrolling speed reasonably fast. You will probably have to adjust this.
16. Make a few screens in a horizontal line to test it out. Make sure you click Auto Scroll on the screens where you want auto scrolling. Also make sure you choose the game state Shooter Stage for the screens where you want your player to appear in his flying state (animation).
That's it! You will probably need to do lots of adjustments to make this work like you want in your game.
PS! This tutorial does not set up a hurt state for the flying stages. So if you get hurt when you're flying you will change to the normal hurt state and fall down (since your action state 7 probably doesn't have Ignore Gravity checked). You can set up one of the other action steps for a flying hurt state, but then you need to adjust your hurtPlayer script to change to that state when you're on game state "Shooter Stage".
")