kevin81
Well-known member
NESmaker tutorial: adding a password system
When creating larger games, you may want to give the player the opportunity to come back to where they left off after a play session. A common way to facilitate this is a password system. I've seen a couple of questions on this topic across the various community sites, like Facebook, Discord and the NESmakers forum. That's why I decided to write up a tutorial on how to add a password system to your NESmaker game.
This tutorial assumes that you are somewhat familiar with NESmaker and Assembly code already. If you've just started using NESmaker, I'd suggest you go to the LEARN page and follow the tutorials (the 12 days of NESmas and the intermediate/advanced module tutorials specifically) first. Also note that there are countless ways to implement a password system, this is just one way to go about it. You may pick and choose from this tutorial whatever you need for your game and implement your own ideas into them.
NOTE: You can find all asm files needed for this tutorial attached to this post; make sure you download these first. I'd suggest you unzip the files inside your NESmaker folder, in the
Before we begin
Before actually making a password screen, we should think about what it should look like and why we need it. How long is a password going to be? What should the password do? Which digits, letters or other characters does the password system use? How will the player enter the password - using an on-screen keyboard (like Metroid), using up/down character by character input (like Dirty Harry), or something more graphical (like Mega Man)?
For this tutorial, I've decided to go with four-digit numeric passwords which will take you to a certain level of your game, going with the Dirty Harry type input scheme. We will add three passwords, which will each take you to a different screen on the overworld. Entering a wrong password will send you to the start of the game. This tutorial is based off the Maze base module, but I think it's not going to be too much of a problem to implement this screen in the other base modules as well.
For this tutorial, the final product may look something like this:
Add assets for your password screen
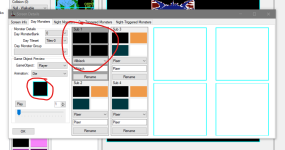
Create the tileset you want to use on your screen, add some music or sound effects if you like, and add a game object for the cursor on your password screen. If you are not yet familiar with these things, of if you don't know how to do this, I'd suggest you go to the LEARN page and follow the tutorials first.
Add Password Screen type
Go to Project Settings (the cog icon in the top icon menu). Open the Project Labels tab and find the item in the Labels list that says GameStates. Choose an unused game state from the Values list (in this tutorial we use GameState-3) and rename it to Password Screen.

Add Password screen to overworld
Go to your overworld. For this we need one empty 8x8 screen which we can assign our password screen to. If you have no 8x8 screens yet, click on Map in the top menu, and then click Advanced Map Properties. Here you can replace two rows of 16x16 screens with a single row of 8x8 screens. In this tutorial, I used the bottom row.

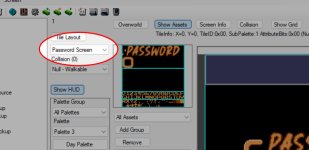
Once you've done that, double-click an empty 8x8 screen. Here, in the dropdown under the Tile Layout button, select "Password Screen". Now you can create the screen by selecting the correct tileset(s), drawing tiles onto the screen, adding music, et cetera. Again, go follow the tutorials first if you're new to this.

Finally, to be able to access the password screen, either set it as the first screen of your game, or modify the Warp Out location of the title screen to warp to the password screen.
Add cursor to the screen
Graphics and music are in place? Great! Let's add the cursor to the password screen now. We want to position the cursor on the right pixel on the screen, so instead of adding it as a monster in the overworld UI, we'll do it through ASM code.
Open the file PostScreenLoad.asm from the tutorial files with your prefered code editor of choice. NESmaker has its own editor, but you can use any text editor, like Notepad, Visual Studio Code, Notepad++ or Sublime, just to name a few. This file contains the following code:
This code checks if the current game state is 3 (i.e. the Password screen), and if it is, it will create object number 8 (which is the cursor in our tutorial project) at pixel position (88,118) on screen, beginning in state 0. You may have to tweak these numbers a bit, for example if your object occupies a different slot in the game objects list, or should be on a different position on screen.
Now, go back to NESmaker. Go to Project Settings, and then click the Script Settings tab. Scroll down to find the "Post screen load" script. In our case, the assigned script was blank*, so we can replace that with a script of our own. To assign a script, click on "Post screen load", then find the script on the right side under Visible .asm files and doubleclick it. If you can't find it in the list on the right, you can also click the Change button above and enter the path to the new script manually in there.
*If your project already has a Post screen load script assigned other than blank, you'll need to add the code above to that existing script file.

Build and test run your game, and you'll see that the cursor is in place on the password screen. But it doesn't do anything yet. For that, we'll need to add a few input scripts to the project. But first, we must set up some additional things.
Add password variables to the zero page
We need to keep track of the digits that the player entered on the password page, as well as where the cursor currently is. For this, we need to add a few variables to the game.
Go to Project Settings and click on the Zero Page RAM tab. here, add the following variables.
- Name: zp_password, Bytes: 4 (these are the bytes where the entered password is stored)
- Name: zp_cursor_location, Bytes: 1 (this is which digit is currently selected by the cursor)

Add the password table data to the game
Now we can keep track of the password, but how would the game know if a password is correct or not? For this, we need to actually add the passwords into the game. We'll be using lookup tables for this.
Go back to your Project Settings > Script Settings and find the script that is assigned to Tables. In our case, a script called ExtraTables_MazeBase.asm is assigned, so we'll need to modify that script.
Open the ExtraTables.asm script from the tutorial files; this is the modified ExtraTables_MazeBase.asm script from the original module. At the end of the file, you'll find the following additions.
Assign this modified script to the Tables script define in the Script Settings.
(to be continued in the next post, please stay tuned...)
When creating larger games, you may want to give the player the opportunity to come back to where they left off after a play session. A common way to facilitate this is a password system. I've seen a couple of questions on this topic across the various community sites, like Facebook, Discord and the NESmakers forum. That's why I decided to write up a tutorial on how to add a password system to your NESmaker game.
This tutorial assumes that you are somewhat familiar with NESmaker and Assembly code already. If you've just started using NESmaker, I'd suggest you go to the LEARN page and follow the tutorials (the 12 days of NESmas and the intermediate/advanced module tutorials specifically) first. Also note that there are countless ways to implement a password system, this is just one way to go about it. You may pick and choose from this tutorial whatever you need for your game and implement your own ideas into them.
NOTE: You can find all asm files needed for this tutorial attached to this post; make sure you download these first. I'd suggest you unzip the files inside your NESmaker folder, in the
GameEngineData/Routines subfolder. Also, please note that while I have tried to document codes as much as possible, whenever something is not clear, please let me know so I can help you with that.Before we begin
Before actually making a password screen, we should think about what it should look like and why we need it. How long is a password going to be? What should the password do? Which digits, letters or other characters does the password system use? How will the player enter the password - using an on-screen keyboard (like Metroid), using up/down character by character input (like Dirty Harry), or something more graphical (like Mega Man)?
For this tutorial, I've decided to go with four-digit numeric passwords which will take you to a certain level of your game, going with the Dirty Harry type input scheme. We will add three passwords, which will each take you to a different screen on the overworld. Entering a wrong password will send you to the start of the game. This tutorial is based off the Maze base module, but I think it's not going to be too much of a problem to implement this screen in the other base modules as well.
For this tutorial, the final product may look something like this:
Add assets for your password screen
Create the tileset you want to use on your screen, add some music or sound effects if you like, and add a game object for the cursor on your password screen. If you are not yet familiar with these things, of if you don't know how to do this, I'd suggest you go to the LEARN page and follow the tutorials first.
Add Password Screen type
Go to Project Settings (the cog icon in the top icon menu). Open the Project Labels tab and find the item in the Labels list that says GameStates. Choose an unused game state from the Values list (in this tutorial we use GameState-3) and rename it to Password Screen.

Add Password screen to overworld
Go to your overworld. For this we need one empty 8x8 screen which we can assign our password screen to. If you have no 8x8 screens yet, click on Map in the top menu, and then click Advanced Map Properties. Here you can replace two rows of 16x16 screens with a single row of 8x8 screens. In this tutorial, I used the bottom row.

Once you've done that, double-click an empty 8x8 screen. Here, in the dropdown under the Tile Layout button, select "Password Screen". Now you can create the screen by selecting the correct tileset(s), drawing tiles onto the screen, adding music, et cetera. Again, go follow the tutorials first if you're new to this.

Finally, to be able to access the password screen, either set it as the first screen of your game, or modify the Warp Out location of the title screen to warp to the password screen.
Add cursor to the screen
Graphics and music are in place? Great! Let's add the cursor to the password screen now. We want to position the cursor on the right pixel on the screen, so instead of adding it as a monster in the overworld UI, we'll do it through ASM code.
Open the file PostScreenLoad.asm from the tutorial files with your prefered code editor of choice. NESmaker has its own editor, but you can use any text editor, like Notepad, Visual Studio Code, Notepad++ or Sublime, just to name a few. This file contains the following code:
Code:
    LDA gameState
    CMP #$03
    BNE +
        CreateObject #88, #118, #8, #0
    +
This code checks if the current game state is 3 (i.e. the Password screen), and if it is, it will create object number 8 (which is the cursor in our tutorial project) at pixel position (88,118) on screen, beginning in state 0. You may have to tweak these numbers a bit, for example if your object occupies a different slot in the game objects list, or should be on a different position on screen.
Now, go back to NESmaker. Go to Project Settings, and then click the Script Settings tab. Scroll down to find the "Post screen load" script. In our case, the assigned script was blank*, so we can replace that with a script of our own. To assign a script, click on "Post screen load", then find the script on the right side under Visible .asm files and doubleclick it. If you can't find it in the list on the right, you can also click the Change button above and enter the path to the new script manually in there.
*If your project already has a Post screen load script assigned other than blank, you'll need to add the code above to that existing script file.

Build and test run your game, and you'll see that the cursor is in place on the password screen. But it doesn't do anything yet. For that, we'll need to add a few input scripts to the project. But first, we must set up some additional things.
Add password variables to the zero page
We need to keep track of the digits that the player entered on the password page, as well as where the cursor currently is. For this, we need to add a few variables to the game.
Go to Project Settings and click on the Zero Page RAM tab. here, add the following variables.
- Name: zp_password, Bytes: 4 (these are the bytes where the entered password is stored)
- Name: zp_cursor_location, Bytes: 1 (this is which digit is currently selected by the cursor)

Add the password table data to the game
Now we can keep track of the password, but how would the game know if a password is correct or not? For this, we need to actually add the passwords into the game. We'll be using lookup tables for this.
Go back to your Project Settings > Script Settings and find the script that is assigned to Tables. In our case, a script called ExtraTables_MazeBase.asm is assigned, so we'll need to modify that script.
Open the ExtraTables.asm script from the tutorial files; this is the modified ExtraTables_MazeBase.asm script from the original module. At the end of the file, you'll find the following additions.
Code:
    ;; The correct passwords: 1234, 1337 and 0081
    tbl_password0: .db #$01, #$02, #$03, #$04  ; password 0 = 1234
    tbl_password1: .db #$01, #$03, #$03, #$07  ; password 1 = 1337
    tbl_password2: .db #$00, #$00, #$08, #$01  ; password 2 = 0081

    ;; These are the high bytes of the adresses where the passwords are stored
    tbl_password_addr_hi:
        .db >#tbl_password0, >#tbl_password1, >#tbl_password2

    ;; These are the low bytes of the adresses where the passwords are stored
    tbl_password_addr_lo:
        .db <#tbl_password0, <#tbl_password1, <#tbl_password2

    ;; This table binds screens that the player warps to, to passwords that are defined above
    tbl_password_warp_screen:
        .db #$10  ; password 0 warps to screen #$10 (or X:0 Y:1 in the Overworld UI)
        .db #$20  ; password 1 warps to screen #$20
        .db #$30  ; password 2 warps to screen #$30
Assign this modified script to the Tables script define in the Script Settings.
(to be continued in the next post, please stay tuned...)


