CluckFox
Active member
In collaboration with other NESMakers on Discord, I have developed a simple golf swing input mechanic that uses the Background HUD. It is based on the Beginner Maze Game tutorial and expands upon it by adding the following:
Create the following four new variables:
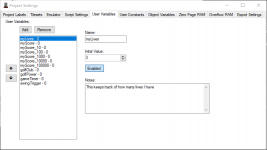
Your User Variables dialog should look like the following picture.
Pick two unused HUD elements and set them to 2: Text in the Type: drop-down. Set the String on one to CLUB: and position it above the LIVES: element. Set the String on the other to POWER: and position it on top of the SCORE: element. The HUD preview should look like the following picture.

Pick one more unused HUD element and set its Type: to 3: Number. Set the Element Var to
Pick the final unused HUD element and set its Type: to 0: Var Tiles. Set its Element Var to
Before the final element will show up, click the button next to Full Tile and pick the solid white square from the selection dialog. Click the button next to Empty Tile and pick the solid tile to the left of the white one.
Position the final HUD element over the number next to SCORE:. The HUD preview should look like the following picture.

Add the following four new constants:
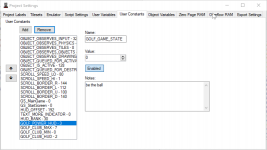
Your User Constants dialog should look like the following picture.
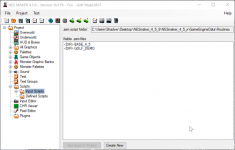
Navigate to Project Hierarchy > Scripts > Input Scripts to verify the GOLF_DEMO directory is visible to NESMaker. Your screen should look like the following picture.
Double-click the GOLF_DEMO directory, and double-click the following four files to add them to your project:
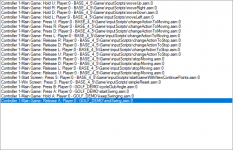
Select Player for Target and Main Game for Game State. Bind the following actions to the new scripts:
Last, include the new Handle Game Timer script to the game.
Navigate to Project Settings > Script Settings
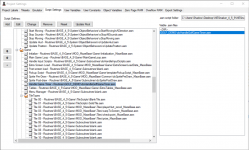
Locate Handle Game Timer in the Game folder, just a few items before the Tiles folder (see image for reference). Select it, then in the Visible .asm files list double click on
Your screen should look like the following once the script is set.
Export and Test your game. You should see the new HUD elements. Change the club selection by tapping the B button. Hold and release the A button a few times to get the swing of the swing meter.
Big thanks to @PewkoGames for testing my WIP code in their WIP games. It's been a pleasure serving the General!
More thanks to @alextheawesome_101 and @9Panzer for reviewing/editing this tutorial.
- Golf Club Selection and Swing Power Meter HUD Elements
- Input Scripts to manipulate Club Selection and Swing Power Meter
- A custom doHandleGameTimer.asm script to pseudo-animate the Swing Power Meter
- User Constants to configure various aspects of these scripts
Usage
Follow the Maze Game Tutorial - Beginner video to create a new NESMaker project. It takes about 30 minutes and serves as the foundation for all the following instructions. You will not need the attached scripts until the final step.Step 1 - Create User Variables
Navigate to Project Settings > User VariablesCreate the following four new variables:
golfClubrepresents a golf club selection, which a later physics computation could use as input.golfPowerrepresents the force of a golf swing from the player starting and stopping the back-and forth motion of the swing meter.swingTriggerused by the new input and timer scripts to actuate the back-and-forth swing metergameTimersame as above
Your User Variables dialog should look like the following picture.

Step 2 - Set Up HUD Elements
Navigate to Project Hierarchy > HUD & Boxes > HUD ElementsPick two unused HUD elements and set them to 2: Text in the Type: drop-down. Set the String on one to CLUB: and position it above the LIVES: element. Set the String on the other to POWER: and position it on top of the SCORE: element. The HUD preview should look like the following picture.

Pick one more unused HUD element and set its Type: to 3: Number. Set the Element Var to
golfClub and the Max Value to 1. Position it above the number next to LIVES:.Pick the final unused HUD element and set its Type: to 0: Var Tiles. Set its Element Var to
golfPower and the Max Value to 8.Before the final element will show up, click the button next to Full Tile and pick the solid white square from the selection dialog. Click the button next to Empty Tile and pick the solid tile to the left of the white one.
Position the final HUD element over the number next to SCORE:. The HUD preview should look like the following picture.

Step 3 - Create User Constants
Navigate to Project Settings > User ConstantsAdd the following four new constants:
GOLF_POWER_HUDwith the index of the HUD element that representsgolfPowerGOLF_CLUB_HUDwith the index of the HUD element that representsgolfClubGOLF_CLUB_MINwith a value between 0-9 as the minimum value allowed forgolfClubGOLF_CLUB_MAXwith a value between 0-9 as the maximum value allowed forgolfClub
GOLF_CLUB_MIN to 4 and GOLF_CLUB_MAX to 6.Your User Constants dialog should look like the following picture.

Step 4 - Add Scripts
Download and unarchive the attached ZIP file. It contains a directory calledGOLF_DEMO. Copy the entire directory to NESMaker_4_5_9\NESMaker_4_5\GameEngineData\Routines. The GOLF_DEMO directory should be at the same level as BASE_4_5.Navigate to Project Hierarchy > Scripts > Input Scripts to verify the GOLF_DEMO directory is visible to NESMaker. Your screen should look like the following picture.

Double-click the GOLF_DEMO directory, and double-click the following four files to add them to your project:
startSwing.asmkeepSwinging.asmendSwing.asmcycleClubAngle.asm
Select Player for Target and Main Game for Game State. Bind the following actions to the new scripts:
- PRESS B -
cycleClubAngle.asm - PRESS A -
startSwing.asm - HOLD A -
keepSwinging.asm - RELEASE A -
endSwing.asm

Last, include the new Handle Game Timer script to the game.
Navigate to Project Settings > Script Settings
Locate Handle Game Timer in the Game folder, just a few items before the Tiles folder (see image for reference). Select it, then in the Visible .asm files list double click on
GOLF_DEMO and then double click doHandleGolfGameTimer.asm.Your screen should look like the following once the script is set.

Try It Out
Export and Test your game. You should see the new HUD elements. Change the club selection by tapping the B button. Hold and release the A button a few times to get the swing of the swing meter.
Credits
Big thanks to @PewkoGames for testing my WIP code in their WIP games. It's been a pleasure serving the General!
More thanks to @alextheawesome_101 and @9Panzer for reviewing/editing this tutorial.
