m8si
Active member
First some background info about this tutorial:
This is how I did my car images for EV Cruising. I consider myself a very poor drawer so I used pictures and converted them into NES. I also used AI to make some of the images for my project and because of that I have opted myself out from the GFX part of the competition. However I think converting "any" image to NES might be a cool trick to share... I am not saying my way of doing this is the only way. And not the best way considering ROM space for sure.
This tutorial uses paint.net to make the editing. Grab yours here: https://www.getpaint.net/
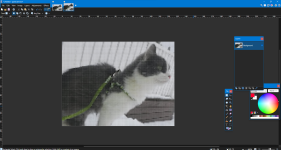
First. Choose an image. I chose image of our cat Kerttu enjoying a calm winter day on the porch.
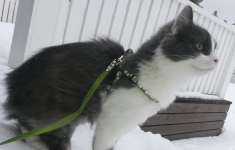
Nametable size is 128 x 48 or if you are going to use both nametables you have 128 x 96 area to play with. So... Open your image in paint.net. Crop it to the size you are familiar with and then use the resize tool to resize the image near 128 x 96 (or 128 x 48) Try to do this at one go because otherwise it would distort the image. Also set the resampling to "Nearest Neighbor"
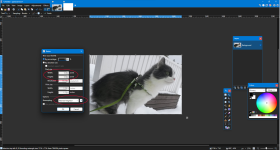
Copy your image, create a new image and paste your image into it. If your image is bigger just keep the canvas size and position your image on the canvas.
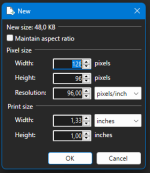
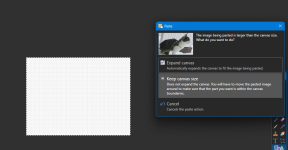
Double check you don't have any blurry pixels... If you did the resizing right you should have an image with sharp pixels, no antialiasing, blurring or any other effects. If you see any of those you may want to try resizing the image again.
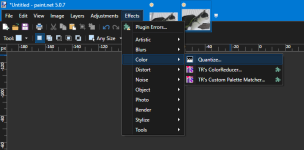
Then go to Effects ---> Color ---> Quantize...
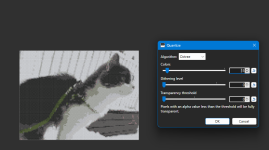
This will reduce the colors in your image... Your goal is to get as near to 4 colors as possible. But most of the time that is not possible without losing precious detail on the image. But no worries. You can manage more colors for now... I chose 15 colors because otherwise the eye and face begun to dissappear. You can play with the other sliders too.
Save the image and open it in NESmaker. Now you have to select palettes for your image. I have a lot of black & gray so I start with the different shades of gray NES has to offer. There is also a green leash so I will add one palette for that too.
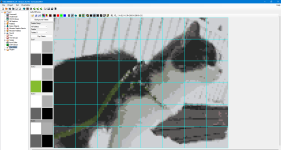
Then one by one, use NESmakers global color change. Try to select a color that best matches the color of the 4-color palette you have chosen... You may also have to redraw some of the pixels depending of your image.
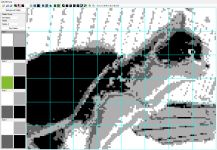
After some careful color choices and some tweeking you should have a NES ready image. Remember you can have different palette only for each 16x16 area. For example here... The most image is black & white but the bottom of the porch is brown and the leash is green. I added those colors to the image by keeping some of the colors in the 1st subpalette and adding green or brown to just a few of them.
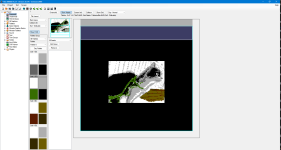
And here it is! Note that this method leaves a lot of room for optimisation and uses a lot of your valuable resourses. That could be more ideally to be used to make your level gfx more beautiful. But if you just want to add some image onto your NES game, this is one way of doing it.
This is how I did my car images for EV Cruising. I consider myself a very poor drawer so I used pictures and converted them into NES. I also used AI to make some of the images for my project and because of that I have opted myself out from the GFX part of the competition. However I think converting "any" image to NES might be a cool trick to share... I am not saying my way of doing this is the only way. And not the best way considering ROM space for sure.
This tutorial uses paint.net to make the editing. Grab yours here: https://www.getpaint.net/
First. Choose an image. I chose image of our cat Kerttu enjoying a calm winter day on the porch.

Nametable size is 128 x 48 or if you are going to use both nametables you have 128 x 96 area to play with. So... Open your image in paint.net. Crop it to the size you are familiar with and then use the resize tool to resize the image near 128 x 96 (or 128 x 48) Try to do this at one go because otherwise it would distort the image. Also set the resampling to "Nearest Neighbor"

Copy your image, create a new image and paste your image into it. If your image is bigger just keep the canvas size and position your image on the canvas.


Double check you don't have any blurry pixels... If you did the resizing right you should have an image with sharp pixels, no antialiasing, blurring or any other effects. If you see any of those you may want to try resizing the image again.

Then go to Effects ---> Color ---> Quantize...
This will reduce the colors in your image... Your goal is to get as near to 4 colors as possible. But most of the time that is not possible without losing precious detail on the image. But no worries. You can manage more colors for now... I chose 15 colors because otherwise the eye and face begun to dissappear. You can play with the other sliders too.


Save the image and open it in NESmaker. Now you have to select palettes for your image. I have a lot of black & gray so I start with the different shades of gray NES has to offer. There is also a green leash so I will add one palette for that too.

Then one by one, use NESmakers global color change. Try to select a color that best matches the color of the 4-color palette you have chosen... You may also have to redraw some of the pixels depending of your image.

After some careful color choices and some tweeking you should have a NES ready image. Remember you can have different palette only for each 16x16 area. For example here... The most image is black & white but the bottom of the porch is brown and the leash is green. I added those colors to the image by keeping some of the colors in the 1st subpalette and adding green or brown to just a few of them.
And here it is! Note that this method leaves a lot of room for optimisation and uses a lot of your valuable resourses. That could be more ideally to be used to make your level gfx more beautiful. But if you just want to add some image onto your NES game, this is one way of doing it.

Last edited:
