baardbi
Well-known member

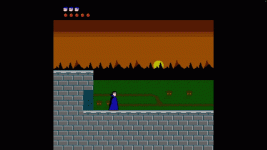
If you want a sunset (like Rygar) or something else to be static in the background while the screen scrolls I made a simple script that will help you do that. This script will show a 2x2 sprite in the background (behind normal tiles). By default the sprite graphic is one sprite tile flipped vertically and horizontally to make a square. So unless you modify the code it's probably best to draw a sprite that looks good when it's combined with flipped versions of itself (like for example the top left part of a sun).
PS! I recommend setting up the userScreenBytes first (or else the script has to be slightly modified). You can find a great tutorial for that here:
Making userScreenByte0-7 work! (Plus Bonus!)
Hey guys, got a quick code edit which will actually link those userScreenBytes on your Screen Info options! Why is this useful? Well, you can store a number in any of those 8 boxes, that is unique to the screen, and it will show up in a variable in game. This can give you some powerful...
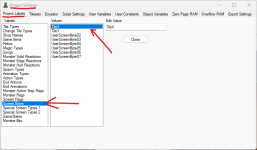
1. Change the labels for UserScreenByte00 and UserScreenByte01 to the following:

2. Put the following code in your doSpritePostDraw.asm file:
;;; Draw background sprites
LDA userScreenByte0
BNE drawBackgroundSprites
JMP skipDrawBackgroundSprites
drawBackgroundSprites:
LDA userScreenByte0
ASL
ASL
ASL
ASL
STA tempA
LDA userScreenByte1
ASL
ASL
ASL
ASL
STA tempB
DrawSprite tempA, tempB, #10, #%00100001
LDA tempA
CLC
ADC #8
STA tempA
DrawSprite tempA, tempB, #10, #%01100001
LDA userScreenByte0
ASL
ASL
ASL
ASL
STA tempA
LDA tempB
CLC
ADC #8
STA tempB
DrawSprite tempA, tempB, #10, #%10100001
LDA tempA
CLC
ADC #8
STA tempA
DrawSprite tempA, tempB, #10, #%11100001
skipDrawBackgroundSprites:
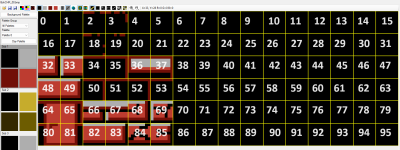
3. Draw a sprite in your GameObjectTiles.bmp file (the one where you draw the player object). This is the sprite that will be used to make the background sprite graphic. You need to make a note of the sprite number from the GameObjectTiles file. If you don't know how to find the number you can use this picture as a reference:

In your doSpritePostDraw.asm file you will see four lines with the DrawSprite macro. It is set up with #10 by default. Change that number on those four lines to match your sprite tile. The last part of the DrawSprite macro (#%11100001) is the attributes for the sprite. You can change these bits if you need to change what palette to use, change the orientation of some sprites or make sure that the sprites aren't drawn behind the background tiles. This is optional though...
%10000000 = Flipped vertically
%01000000 = Flipped horizontally
%00100000 = Display sprite behind the background tiles
%00000011 = What sprite palette to use
%00000000: Sprite palette 0
%00000001: Sprite palette 1
%00000010: Sprite palette 2
%00000011: Sprite palette 3
4. In your Screen Info you can now set up where you want this background sprite graphic to appear. Use the "Tile X" and "Tile Y" user screen bytes to specify the coordinates. It's important to set this up on the first screen if you have a scrolling level. If the "Tile X" user screen byte is 0 then the background sprite graphic will not be drawn at all. So set that to 0 on the screens where you don't want this background sprite.
5. That's it.
PS! Remember that NESmaker is set up with black as the transparent color by default. If you change the default black color for tiles (top left in the sub palette), then you also need to change the black color for you player sprite to the same color. However (thanks to dale_coop) there is a fix for this:
[4.5] Quick fix for the 1st screen/sprite color palette issue
In the 4.5, there is a small issue, the loading palette is done differently than the previous version, causing the screen 1st color always been rewritten by the Player 1st color (the transparent color #0): (my screen uses the 0C color as 1st color) (my player uses the 15 color as transparent...
Last edited:
